Saturday, August 4, 2018
Slow progress
Sorry for the lack of posts lately. After my last post, most of the work done was just cutting more spot welds. I haven't touched the car in several weeks because I have some other projects going on at the moment that are taking priority, but hope to be working on it again soon. Slow progress is better than no progress.

Sunday, May 13, 2018
Driver's floor pan pt. 1
If you looked through my previous pictures, you've seen that the floor boards on my driver's side were almost nonexistent. Water had gotten into the car and caused rust to the point that very little metal was left. A week or two ago, I roughly cut out the bulk of the rust with a sawzall cutting around the places where the pan was welded to the frame. Today I started to cut out the spot welds holding the remaining floor in. I've never needed to cut spot welds before, so it was a bit of a learning process. I found that for most of the spot welds, it was easier to just grind them off instead of using the spot weld drill. Because of the severe rust and pitting, it was difficult to determine exactly where each spot weld was and the spot weld bit didn't always cut where I needed. I thought I made pretty good progress.
 |
| I think this may be the most difficult part. This is the side of the reinforcement piece that goes over the transmission tunnel. It sandwiches the floor pan between it and the frame below. I'm guessing I'll have to remove it. |
 |
| Most of the floor pan is out and now you can see the frame below. Still quite a bit to go around the perimeter, but this is a great start. This pic shows how the pan is sandwiched by the transmission tunnel reinforcement piece. |
Added structural reinforcement
Its probably overkill for suck a light car, but I wanted to weld in some square steel tubing to reinforce things before I cut out the major sections of rust. Not really an exciting step, but its something checked off the list.
 |
| Two supports going each way should stiffen things up substantially. |
Thursday, April 26, 2018
Parking Brake
I finally got to use a tool I've had sitting around for a long time... my spot weld cutter set. I got a set of them a few years back to do a different car, but that car is now on the back burner. I also have a spot weld drill, but due to clearance issues, I figured I'd just use the spot weld bits for this job.
If you've looked at the parking brake on these cars, you know its welded in. Fortunately, or unfortunately depending on your perspective, mine was only attached halfway because the bracket was rusted through in several places. I'm going to have to find someone who makes the bracket new or fabricate one myself. The lever itself isn't in bad condition, but the rest of the components will need a full restoration.
If you've looked at the parking brake on these cars, you know its welded in. Fortunately, or unfortunately depending on your perspective, mine was only attached halfway because the bracket was rusted through in several places. I'm going to have to find someone who makes the bracket new or fabricate one myself. The lever itself isn't in bad condition, but the rest of the components will need a full restoration.
 |
| You can't see the extensive rust from this side, but the other side is almost nonexistent where it meets the floor pan. |
Monday, April 23, 2018
Warmer weather
Spring has finally started to arrive! I've got to say, this is one of the latest springs I ever recall. Winter just doesn't want to give it up this year.
I haven't gotten much done yet, but am finally starting to get back at this car. One thing I've started is the wheels. I haven't made a final decision on what wheels I'll use when that time comes, but at the very least, I'd like to have the wheels that came with the car ready in case I go that route. My car originally came with steel wheels and hubcaps which I think is a good look. Maybe that's because I was originally a Mopar guy and I like the Mopars with the body colored steel wheels. Then again, maybe I'll convert to knock-offs.
Currently, I'm trying to find a good color match for the wheels. Ideally, I'll get them powder coated, but that's assuming I find the right color. I'm not against painting them, but that would be my second choice. While I'm trying to get the color matched, I at least had the old tires removed. They were in such sad shape that most of them had holes several inches long in them.
I haven't gotten much done yet, but am finally starting to get back at this car. One thing I've started is the wheels. I haven't made a final decision on what wheels I'll use when that time comes, but at the very least, I'd like to have the wheels that came with the car ready in case I go that route. My car originally came with steel wheels and hubcaps which I think is a good look. Maybe that's because I was originally a Mopar guy and I like the Mopars with the body colored steel wheels. Then again, maybe I'll convert to knock-offs.
Currently, I'm trying to find a good color match for the wheels. Ideally, I'll get them powder coated, but that's assuming I find the right color. I'm not against painting them, but that would be my second choice. While I'm trying to get the color matched, I at least had the old tires removed. They were in such sad shape that most of them had holes several inches long in them.
 |
| Ready for media blasting |
Sunday, February 4, 2018
Got some new toys
I realize I haven't posted in a while, but its been too cold to do any work on the Volvo. Once winter sets in, I only do work on cars if I absolutely have to. Its no fun working with cold steel tools and car parts in a concrete and brick garage only to lose feeling in my hands and to get my knuckles busted open from the slightest mishap. This is supposed to be fun, not punishment.
Despite the lack of progress on the Volvo, I have been getting some things checked off the to-do list. First, I finally got a metal shrinker stretcher. This tool should get a fair bit of use when fabricating patches for some of my Volvo's rusted body parts. For example, I expect I'll be using it quite a bit to fabricate new sections of the trunk and hood gutters. Since my car sat for so long, debris got lodged in these gutters which acted as a sponge for moisture, thereby rusting out sections in both the front and back of the car.
Also, I recently bought a blast cabinet. I've been wanting one for years! If I'm right, I'll be finding all sorts of uses for it. I just bought one of the stand up Harbor Freight models, but I also did several of the upgrades you can find online for it. I bought it knowing that some parts will wear out quickly and will need replaced soon, but for the price, that's not really a concern. I'll upgrade them as they break. It takes quite a bit of time to put it together, and even more to modify it, so don't think you'll have it up and running in a few hours if you buy one. Plus, you may need to plumb it into your air compressor lines and you'll probably want to buy a dust separator so the debris doesn't wreak havoc on your shop vac.
Despite the lack of progress on the Volvo, I have been getting some things checked off the to-do list. First, I finally got a metal shrinker stretcher. This tool should get a fair bit of use when fabricating patches for some of my Volvo's rusted body parts. For example, I expect I'll be using it quite a bit to fabricate new sections of the trunk and hood gutters. Since my car sat for so long, debris got lodged in these gutters which acted as a sponge for moisture, thereby rusting out sections in both the front and back of the car.
Also, I recently bought a blast cabinet. I've been wanting one for years! If I'm right, I'll be finding all sorts of uses for it. I just bought one of the stand up Harbor Freight models, but I also did several of the upgrades you can find online for it. I bought it knowing that some parts will wear out quickly and will need replaced soon, but for the price, that's not really a concern. I'll upgrade them as they break. It takes quite a bit of time to put it together, and even more to modify it, so don't think you'll have it up and running in a few hours if you buy one. Plus, you may need to plumb it into your air compressor lines and you'll probably want to buy a dust separator so the debris doesn't wreak havoc on your shop vac.
 |
| Assembling the blast cabinet. There are lots of parts of screws to deal with. |
 |
| Finally assembled and ready to clean its first part. |
Saturday, November 4, 2017
The first order has arrived
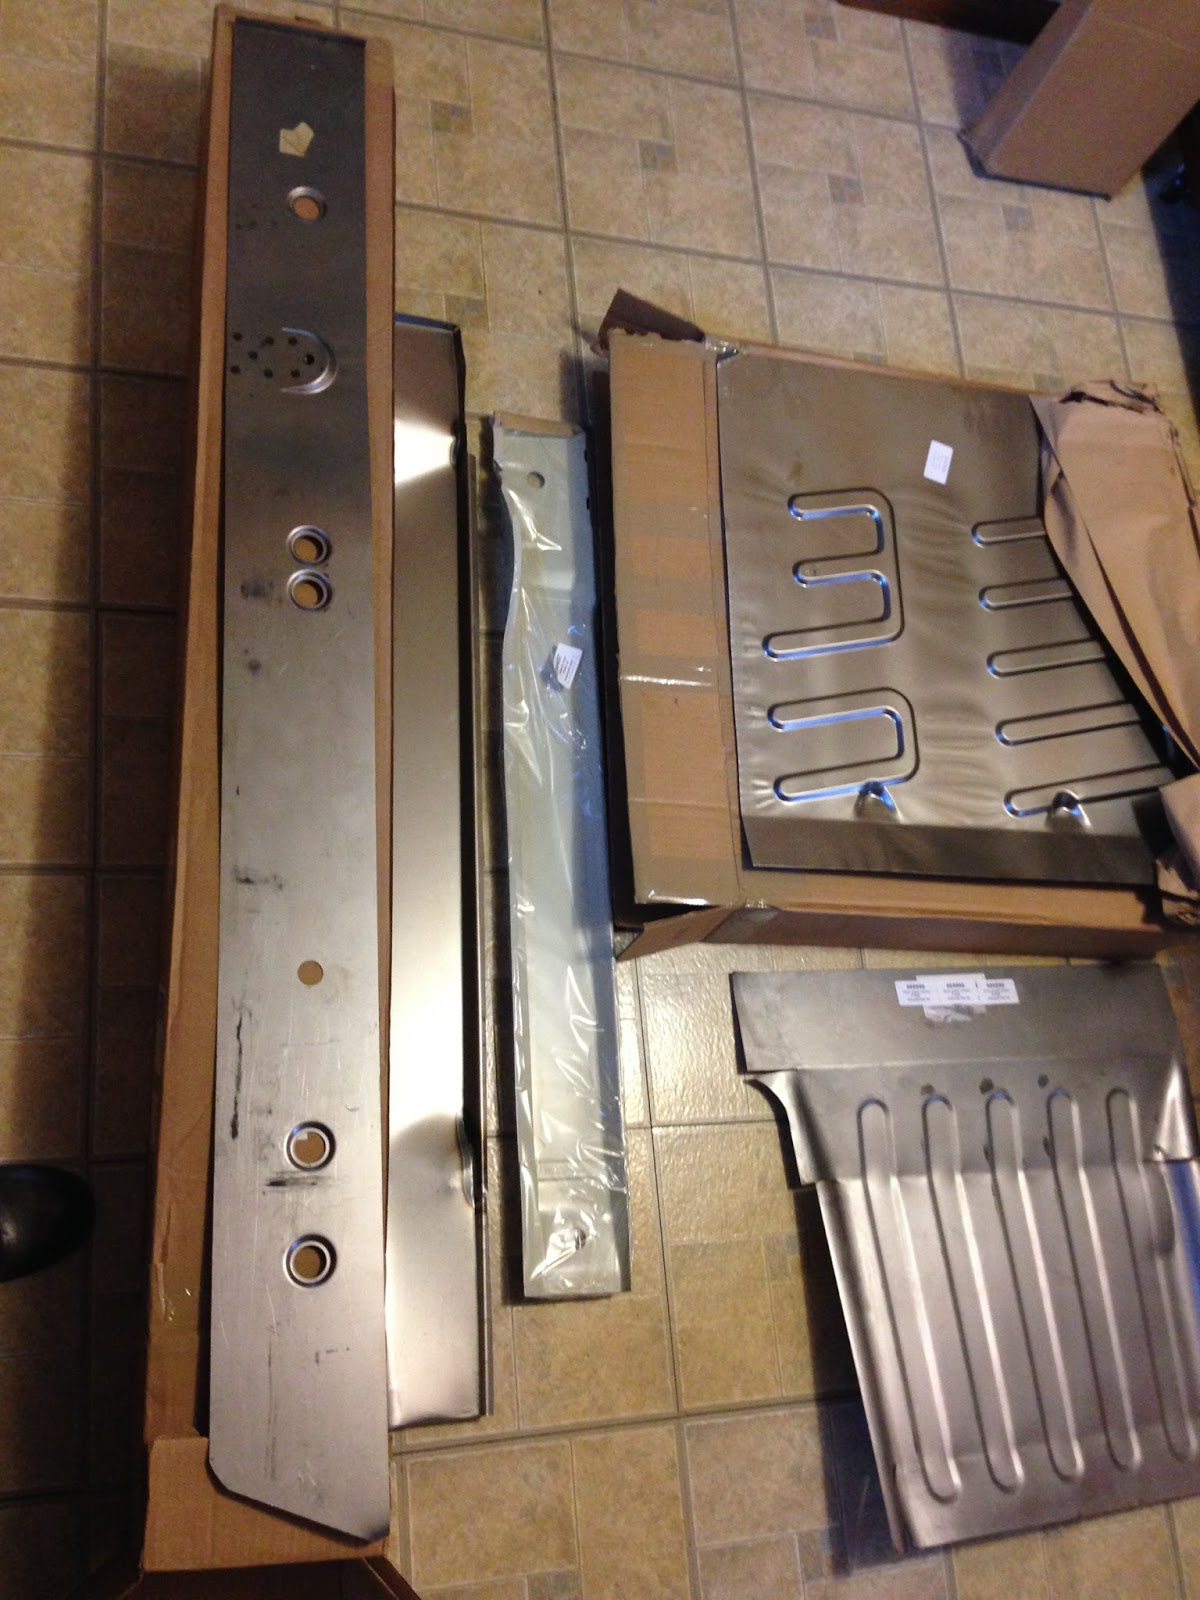
After much waiting, today I finally received the order I had placed for the drivers side floor pans and sill panels. Since mine are practically nonexistent due to the water infiltration in my car, they should be a good starting point for the bodywork.
The panels seem to be decent quality at first glance, though its obvious they will require some work. I haven't trial fitted any of this stuff yet, so my opinion may change. The floor pans like like decent stampings. The sill inner piece looks to be an original OEM Volvo piece. The middle and outer sill pieces look to be hand formed. Right now I think they'll work fine, but they'll need some work on the seams and on some low spots created when they were shaped.
Its already November, so I'm not sure if I'll really get a chance to work on these in the near future. Cold weather is quickly approaching and I don't have a heated garage. Guess we'll find out.


The panels seem to be decent quality at first glance, though its obvious they will require some work. I haven't trial fitted any of this stuff yet, so my opinion may change. The floor pans like like decent stampings. The sill inner piece looks to be an original OEM Volvo piece. The middle and outer sill pieces look to be hand formed. Right now I think they'll work fine, but they'll need some work on the seams and on some low spots created when they were shaped.
Its already November, so I'm not sure if I'll really get a chance to work on these in the near future. Cold weather is quickly approaching and I don't have a heated garage. Guess we'll find out.

Saturday, September 23, 2017
Waiting...
So the Volvo is in waiting at the moment. A few things have happened that have taken priority over its restoration, but I should be working on it again soon. Work has been crazy, I just finished a certification exam for my job, I've needed to do some work on my daily drivers, and I needed to get my Jaguar ready for the St. Louis All British Car Show that took place today. On top of that, I ordered some of the sheetmetal I'll need for the Volvo, and one of the floor pans was only stocked at the supplier's Swedish warehouse, so I'll need to wait several weeks for it to arrive. Once the order comes in though, I'm hoping the weather is still warm enough for me to at least get started on replacing the drivers side floor pans and sill.
 |
| My Jaguar XJ6 at the British car show. This was my project before I purchased the Volvo. I know what you're thinking... I'm a glutton for punishment. |
Saturday, August 26, 2017
Rear end removal
The rear was really easy to remove. Basically a few bolts holding it in, remove the driveshaft, and drop it out. The only issue I had was getting the upper shock nuts off. Since they were going to be way too much work for something that wasn't being reused anyway, I just took my sawzall and cut the nuts and stems off. This ended up taking about a minute instead of potentially lots more time if I had worked to remove the nuts with a wrench.
Now the car is essentially completely stripped. There are a handful of small items I still need to remove because they either wouldn't come off or didn't get in the way of removing everything else. I'll use my welder to remove the things that are stuck and the other items should only take a few minutes.
Now the car is essentially completely stripped. There are a handful of small items I still need to remove because they either wouldn't come off or didn't get in the way of removing everything else. I'll use my welder to remove the things that are stuck and the other items should only take a few minutes.
 |
| Rear bumper removal |
 |
| Bad pic, but you can see me dropping the rear axle assembly out the bottom |
Saturday, August 19, 2017
Front end removal
Made some nice progress today. Was able to take out the front engine cradle and suspension assembly along with the front bumper. The front of the car is now stripped.

 |
| Dropping the assembly |

 |
| Bumper resting on the car after removal |
Tuesday, August 15, 2017
Removing remaining trim
This post should catch us up to where I'm currently at with the car. The only thing remaining is to remove the suspension. The plan is to roll the car out of the garage so I can clean my garage bay really well one last time. Then I'll roll the car back in, put it up on jack stands, and remove the front and rear suspension as well as the bumpers. At that point, it will be completely disassembled and will be ready for the cutting wheel.
I looked through my pics and found that I didn't really take any pictures for the majority of the trim removal. Much of it has studs and nuts on the backside. This includes things like the rear fin trim, license plate trim, and turn signals. The drip rail molding was removed very carefully with the rounded side of a bottle opener. The quarter window trim is held in with four screws on each side.
The vertical quarter window trim can be gently pried off. Expect many of the retainers to break when you do this, but the trim won't be distorted. The side trim that runs from the fender to the rear quarter can also be gently pried off, as well as the front badge. The rear badges have clips holding the studs tightly in the trunk compartment. I used some needle nose pliers and a small flat blade screwdriver to get them off, but they can be very stubborn.
I looked through my pics and found that I didn't really take any pictures for the majority of the trim removal. Much of it has studs and nuts on the backside. This includes things like the rear fin trim, license plate trim, and turn signals. The drip rail molding was removed very carefully with the rounded side of a bottle opener. The quarter window trim is held in with four screws on each side.
 |
| Quarter window lower and vertical trim |
The vertical quarter window trim can be gently pried off. Expect many of the retainers to break when you do this, but the trim won't be distorted. The side trim that runs from the fender to the rear quarter can also be gently pried off, as well as the front badge. The rear badges have clips holding the studs tightly in the trunk compartment. I used some needle nose pliers and a small flat blade screwdriver to get them off, but they can be very stubborn.
Wednesday, August 9, 2017
Getting the glass out pt. 2
The next task at hand was to remove the rear glass and windshield. They're both done the same way. First, you'll need to remove the trim work which isn't difficult. For both the windshield and rear glass, you'll find a union piece at the top and bottom middle of the glass. Pry one of them off. The large trim pieces that go half way around each window are simply held in place using a rubber lip on the top of the weatherstripping. Both the weatherstripping and and trim work have a groove that slip into one another to hold it in place. Take your fingers and gently start pushing the end of the trim work towards the center of the window. This should push it out of its groove. Now just work your way around the window until its removed. You'll be able to slide it out of the other union without having to remove it. Repeat for the other side and you're done.
I removed these pieces of glass the same way as the quarter window glass. In other words, I used a box cutter to cut the weatherstripping and then just popped the glass out.
The car looks considerably different without glass in it.


I removed these pieces of glass the same way as the quarter window glass. In other words, I used a box cutter to cut the weatherstripping and then just popped the glass out.
The car looks considerably different without glass in it.


 |
| Peeling away the weatherstripping after cutting. |
 |
| Easier than it looks. |
Monday, August 7, 2017
Getting the glass out
Fortunately for us, the glass in our cars in installed using gaskets. This makes it a bit easier to remove. I started with the quarter window glass. It was pretty easy to remove using a box cutter. I pushed the cutter between the glass and the lip of the weatherstrip and starting cutting at a slight angle. Essentially, you're trying to cut off the outer lip of the seal.
After cutting off the out lip, the window should pop outward fairly easily.
The vent windows were next. Remove the five screws at the top (three large and two small) and the two bolts at the bottom inside the door. Now roll the window down and you should be able to pull the vent window assembly out the top.
The vent window provides the front channel for the door glass, so you're already part of the way towards getting it out. Remove the locating bracket in the top middle of the door (two screws) and any screws holding the window regulator in the door. You should be able to slightly angle the glass and pull it out now. Then, you can pull the regulator through the large hole in the door. Sorry, I guess I didn't take pics of these steps.
 |
| Cutting the seal at roughly a 45 degree angle. |
After cutting off the out lip, the window should pop outward fairly easily.
 |
| Remove the glass and then pull out the rest of the weatherstrip by hand. |
The vent windows were next. Remove the five screws at the top (three large and two small) and the two bolts at the bottom inside the door. Now roll the window down and you should be able to pull the vent window assembly out the top.
The vent window provides the front channel for the door glass, so you're already part of the way towards getting it out. Remove the locating bracket in the top middle of the door (two screws) and any screws holding the window regulator in the door. You should be able to slightly angle the glass and pull it out now. Then, you can pull the regulator through the large hole in the door. Sorry, I guess I didn't take pics of these steps.
Sunday, August 6, 2017
Windshield wipers
Now that I had the dash out, it was time to remove the windshield wiper components. Actually, I had a little difficulty trying to figure out how to get the wiper arms off, but the rest was straight forward. The trick with the wiper arms is a small locking tab located on the bottom of the arm that locks the arm to the splined drive pinion. Its virtually impossible to see without a mirror. If you pull the tab back, the arms should come off with some persuasion. Once off, you can remove the large nuts that hold the drive pinion covers on and remove the wiper motor from the interior side.
 |
| Removing the drive pinion nuts will allow you to pull the wiper drive shafts through the bottom. |
 |
| Once the drive pinion nuts are removed, the wiper motor and linkage assembly is only held in by two bolts directly behind the motor. |
Saturday, August 5, 2017
Fuel tank
The fuel tank on my car is completely shot. Its one of the worst ones I've ever seen. The bottom was swollen so bad that it looked like it was going to explode. Also, the bottom of the tank had more rust than I thought possible. To top it off, the nipple broke off just trying to disconnect one of the hoses that attaches to the top.
 |
| Disconnect the lines, unscrew the phillips head screws around the outside, and break the seal around the perimeter. Once done, it can be removed from the trunk. |
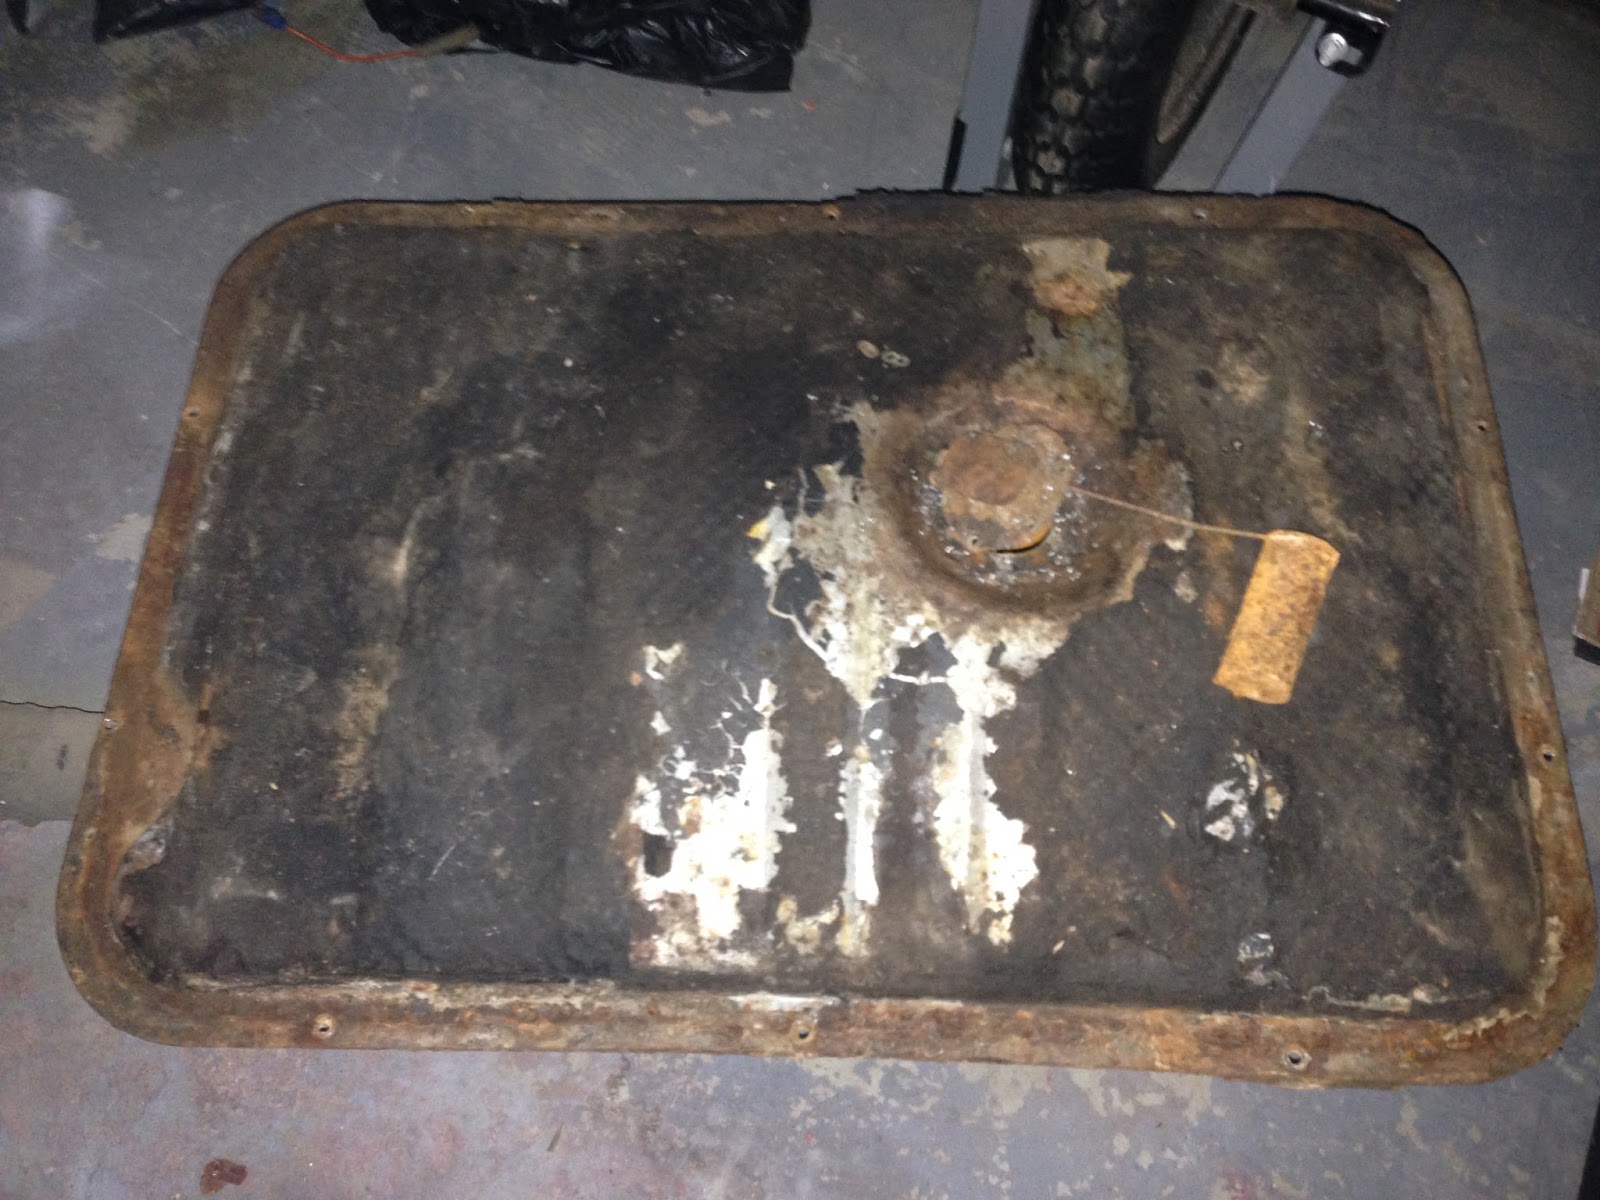 |
| Tank and sending unit... both junk. Two more parts to add to the parts list. |
Wednesday, July 26, 2017
Dashboard
The dashboard turned out to be a bit more difficult than I thought it would be. Its fairly straightforward. However, laying on top of a large hole in the floorboard made it pretty uncomfortable. Also, the moisture that had gotten into the car had corroded some of the thumb nuts that hold on some of the gauges resulting in them being difficult to remove. By far the biggest issue though was the ignition switch. If I ever find the person who designed this component, they had better run... and fast!
The ignition switch is wired directly to the ignition coil on these cars. In fact, its all one part and they can't be separated. Because of this, you have to remove the ignition switch from the dash frame before the frame can be removed. Otherwise, it will still be tethered to the car by the metal encapsulated cable that runs through the firewall to the coil. To top it off, the coil is too large to fit through the hole in the firewall, so it must be removed from the engine side.
At first, I tried to drill the tumbler out of the switch so I could remove the bezel that holds it into the dash frame. No luck. In the end, I was forced to go to plan B. I removed the screws holding the switch to the bottom of the dash frame which gave me a little wiggle room. Then I carefully used a flat blade screwdriver behind the bezel to give me a little space between the bezel and dash fascia. It sounds like overkill, but I took a dremel with a cutoff wheel and cut through both sides of the switch bezel so that it could be removed thereby allowing me to remove the switch/coil assembly from the car. Easily one of the stupidest designs I've ever seen on any car.
After getting everything off, I removed the dash frame.
 |
| Removing the gauges. Lots of labelling and disconnecting to do during this step. |
Saturday, July 22, 2017
Taking out more stuff
This next step is kind of a boring one... just removing more stuff from the engine compartment. Out comes the master and clutch cylinders, heater box, bonnet support, and a bunch of other stuff. If any of you ever need to remove your heater box, it extends through the firewall into the passenger compartment, so you may have to maneuver it out from the interior side. Another step towards starting on the bodywork.
 |
| Firewall is mostly stripped |
Monday, July 17, 2017
Engine removal
Next came removing the engine and transmission assembly. I know some people like removing them separately, but I always like doing it as a unit on any car. It can be a pain to access some of the bell housing bolts and you're forced to keep crawling under the car each time you rotate the engine. The removal is fairly straightforward. The only thing unusual is the shifter housing which most transmissions don't have. It can cause some clearance issues when trying to get the assembly out, but if you take your time, you can maneuver it. An engine lift leveler is a must.

Sunday, July 16, 2017
And so it begins...
And so begins the process of dismantling the car. The plan is to strip it down to its shell and begin the bodywork. The logical place to start the disassembly is the interior. Since water had been getting in for years, the interior was very moldy, not to mention the other components were just wore out.
Also, I wanted to get a better idea of how bad the floors were. I knew there were holes on the drivers side, but didn't know how extensive. At the very least, I would have to remove the seats and carpeting to know. Because of the mold and mildew, I used a respirator to get all of this stuff out.
The driver's side was actually a little better than expected. Of course, pretty much everything on this side will need to be replaced from the transmission tunnel outward. The rest of the removal was pretty straightforward. No big surprises here, but the interior has certainly seen better days.
 |
| Probably due for a refresh |
Also, I wanted to get a better idea of how bad the floors were. I knew there were holes on the drivers side, but didn't know how extensive. At the very least, I would have to remove the seats and carpeting to know. Because of the mold and mildew, I used a respirator to get all of this stuff out.
 |
| As you can see, there's not much left to the driver's side floor. |
 |
| Whats left after removing the rear seat and shelf. |
Saturday, July 15, 2017
Bath time
These first few posts will be to catch you up to where I'm at on the car at this point.
First thing to do was to clean the car. After having sat outside for years, it was filthy and I wanted to see what I was actually working with. The car was covered in dirt and a green mildew-like stuff. You couldn't even see through the windows. Time to give it a much needed bath.

First thing to do was to clean the car. After having sat outside for years, it was filthy and I wanted to see what I was actually working with. The car was covered in dirt and a green mildew-like stuff. You couldn't even see through the windows. Time to give it a much needed bath.
 |
| She actually cleaned up better than I thought. |

Subscribe to:
Posts (Atom)